If you’re tackling a new flooring project in Malta, you’ve probably heard the term “screeding” tossed around by contractors and builders. But before you can even think about pouring that perfect layer of screed, there’s a vital first step that can make or break your results: preparing subfloor for screeding.
This isn’t just a checkbox task—it’s a make-or-break process that determines the durability, levelness, and overall quality of your finished floor. Whether you’re planning a new build or renovating an old space, proper subfloor prep is key to ensuring your screed adheres correctly and lasts for years.
So, let’s dig into the essential truths about preparing subfloor for screeding. By the end of this guide, you’ll know why it matters, how to do it right, and what common mistakes to avoid.
✅ Why Is Preparing Subfloor for Screeding So Important? | Preparing Subfloor For Screeding
Let’s start by answering the keyword head-on: Preparing subfloor for screeding means getting the base layer underneath your screed completely ready—clean, level, stable, and primed—so the screed can be laid evenly and perform well over time.
Why does this matter so much?
Because screed, whether traditional sand-cement or flow screed, needs a stable and even surface to bond to. A poorly prepared subfloor can lead to:
Cracks or de-bonding
Uneven flooring
Moisture penetration
Costly repairs down the line
In other words, preparing the subfloor is like laying a solid foundation for a building—it’s invisible but essential.
Especially in Malta’s hot climate and variable humidity, getting this part right is crucial. Moisture issues, salt attack, and substrate movement are all more common here, and they can be mitigated with proper subfloor prep.
🛠 Step-by-Step Guide to Preparing Subfloor for Screeding | Preparing Subfloor For Screeding
Preparing subfloor for screeding involves more than just sweeping up dust. Here’s a step-by-step breakdown to help you or your contractor get it right from the beginning.
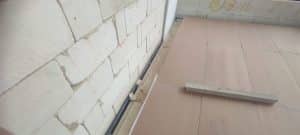
1. Inspect the Subfloor Thoroughly | Preparing Subfloor For Screeding
Before you do anything else, you need to assess the current state of the subfloor. Is it concrete? Timber? Insulation board? Old tiles?
Common issues to look for include:
Cracks or movement in the surface
Hollow-sounding areas, which may indicate voids
Moisture levels, especially in basements or ground floors
Contaminants like oil, paint, or adhesives
Pro Tip: For concrete subfloors, a moisture test is crucial. A high moisture content can stop screed from bonding properly.
You want the substrate to be:
✅ Stable
✅ Structurally sound
✅ Dry (below 75% RH for most screeds)
✅ Clean and dust-free
2. Clean and Remove Contaminants | Preparing Subfloor For Screeding
This step is critical. Even minor traces of oil, dirt, or old adhesives can interfere with the screed’s ability to bond.
Tools you might need:
Vacuum cleaner (industrial grade)
Wire brush or floor grinder
Degreasing agents for oil or grease
Avoid using water to clean unless you have ample drying time. Water introduces moisture into the substrate and delays screeding.
3. Apply a Bonding Agent or Primer | Preparing Subfloor For Screeding
Once the surface is clean, it’s time to prime the subfloor. This helps the screed adhere more effectively, especially in cases where a bonded screed system is being used.
Types of primers and bonding agents:
Acrylic primers – for improved adhesion on concrete
PVA or SBR-based products – ideal for porous or dusty substrates
Epoxy bonding agents – used for more challenging surfaces
Most products cost between €3–€6 per m² including labor in Malta.
Applying the correct primer reduces the risk of:
Screed curling
Cracking
Debonding from the substrate
4. Address Insulation and Damp-Proofing | Preparing Subfloor For Screeding
In modern buildings, especially energy-efficient homes, it’s essential to include thermal or acoustic insulation layers below the screed. But these need to be correctly laid and protected.
Rigid foam boards or polyurethane panels are common.
Lay a damp-proof membrane (DPM) if the subfloor is on ground level or in a humid environment.
Overlap joints by at least 100mm and tape them securely.
Failing to install insulation or DPM correctly can lead to heat loss or moisture damage, which reduces the life of your screed and floor finish.
5. Create Expansion Joints and Edge Strips | Preparing Subfloor For Screeding
Before you start mixing screed, it’s time to think about movement.
Screeds expand and contract with temperature changes, so expansion joints and perimeter edge strips are vital.
Use 5–10 mm foam edge strips around walls and columns.
Insert expansion joints every 40m² or in long narrow rooms (over 8 m).
Plan joints around fixed objects like columns or door thresholds.
This helps avoid random cracking after drying and allows for natural movement.
💡 Extra Tips for Perfect Subfloor Prep | Preparing Subfloor For Screeding
Here are some bonus tips for getting the best out of your screeding project:
✔ Use the Right Tools
Laser levels, straightedges, and industrial vacuums make a huge difference in quality and speed.
✔ Don’t Rush the Drying
Let primers or bonding agents dry according to the manufacturer’s instructions—usually 1–24 hours.
✔ Control Ambient Conditions
Malta’s summer heat can dry screeds too quickly, leading to cracks. Avoid direct sun and consider mist-spraying the surface after laying.
✔ Use a Professional
Not comfortable doing this alone? Preparing subfloor for screeding isn’t a DIY walk in the park. It requires knowledge of materials, local humidity conditions, and structural loadings.
👉 You can always get professional screeding services by contacting us directly here:
🔗 https://kibitec.com/contact-us/
💶 How Much Does It Cost to Prepare a Subfloor for Screeding in Malta? | Preparing Subfloor For Screeding
Costs will vary based on the size of the area, condition of the subfloor, and whether you’re insulating or using bonding agents.
But as a general guide:
| Service | Estimated Cost per m² (Malta) |
|---|---|
| Surface Cleaning & Grinding | €2–€4 |
| Moisture Testing | €1–€3 |
| Bonding Agent Application | €3–€6 |
| Edge Strip Installation | €1–€2 |
| DPM Installation | €5–€8 |
| Insulation Layer (Optional) | €10–€15 |
So if you’re preparing a 100m² floor, your prep cost could range from €1,200 to €2,500—well worth the investment when you consider the lifespan and quality improvement of your screeded surface.
📌 Real Talk: What Happens If You Skip Subfloor Prep? | Preparing Subfloor For Screeding
Let’s say you skip proper subfloor preparation. What’s the worst that can happen?
Hollow spots or delamination in the screed
Cracking due to poor bonding or substrate movement
Uneven flooring, especially visible with tiles or polished concrete
Higher repair costs—fixing a failed screed often costs more than doing it right the first time
Think of it like applying paint to a dirty wall—it might stick, but it won’t last.
🔗 Where Does Screed Fit into Turnkey Construction? | Preparing Subfloor For Screeding
In a typical turnkey construction project, screeding is one of the critical phases between structural works and finishes. It’s the literal and figurative platform on which your flooring success rests.
Contractors like Kibitec ensure every step of the process—from preparing the subfloor to laying the final screed—is done right, so you’re not left patching up cracks six months later.
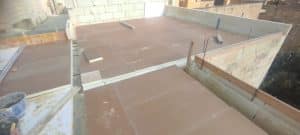
🕒 Drying Time and Curing – Don’t Rush This Crucial Phase | Preparing Subfloor For Screeding
Once your subfloor is prepped and the screed is applied, the next big mistake to avoid is rushing the drying process. Even with all your prep work done perfectly, improper curing can ruin the end result.
How Long Does Screed Take to Dry in Malta? | Preparing Subfloor For Screeding
This varies depending on the screed type, thickness, and ambient conditions. In Malta’s hot and humid climate, drying might be faster, but that’s not always a good thing. Too-fast drying can lead to surface cracks or curling.
Here’s a general guideline:
| Screed Type | Drying Time per 1cm Thickness |
|---|---|
| Traditional Sand/Cement | 1 day per mm (e.g. 50mm = ~50 days) |
| Fast-Drying Screeds | 4–10 days total |
| Liquid Flow Screeds (Anhydrite) | 1 day per mm up to 40mm, then 2 days per mm |
But don’t just go by the calendar—always measure moisture content before laying your final floor finish. This ensures your screed is below the required 2–3% moisture level (or even lower for timber or vinyl).
How to Cure Screed Properly | Preparing Subfloor For Screeding
Cover with polythene sheeting for at least 7 days to avoid rapid moisture loss.
Avoid direct sunlight and drafts, especially in Maltese summer months.
Don’t walk on it for 24–48 hours (for fast-drying screeds, even less).
Mist spray for traditional screeds can help prevent early shrinkage.
Curing isn’t optional. It’s the quiet behind-the-scenes hero that ensures your screed doesn’t crack or curl.
🧱 Types of Screeds and How They Affect Subfloor Prep | Preparing Subfloor For Screeding
Depending on what kind of screed you’re installing, subfloor preparation can vary slightly. Let’s explore how.
1. Bonded Screed
Bonded screeds are fixed directly onto the concrete substrate with a bonding agent. They’re ideal for thin applications (25–40mm) and require the most rigorous subfloor preparation.
✅ Key Requirements:
Mechanically clean the subfloor
Apply strong bonding slurry (like SBR with cement)
Perfect for:
Garages
Commercial floors
Renovations
2. Unbonded Screed
This type sits on a separating layer—like a polythene sheet—and is not attached to the base. It’s typically 50mm+ thick and allows for movement.
✅ Key Requirements:
Smooth DPM membrane
Fully flat and even insulation below
Great for:
Ground floors
Moisture-prone areas
3. Floating Screed
Laid on top of insulation—either thermal or acoustic—floating screeds must be at least 65mm thick (75mm for heavy loads). Subfloor prep must ensure insulation is rigid and level.
✅ Key Requirements:
Overlapping DPM
Edge strip around perimeter
Load-bearing insulation boards
Best for:
Underfloor heating
Eco-builds
Apartments
⚠️ Common Mistakes to Avoid When Preparing Subfloor for Screeding | Preparing Subfloor For Screeding
Let’s go through some costly missteps we’ve seen on Maltese job sites—so you can steer clear:
❌ Skipping Moisture Testing
Just because a floor “looks dry” doesn’t mean it is. Moisture is sneaky, and can come back to haunt you if not tested properly. Always test with a calcium carbide or digital hygrometer.
❌ Uneven Insulation Layers
One of the top causes of lumpy screed floors. Always double-check insulation is flat and snugly fit, with no gaps or steps.
❌ Using the Wrong Primer
Different substrates need different bonding agents. Don’t use a universal primer on an oily surface or highly porous slab.
❌ Failing to Install Edge Strips
This small, cheap material prevents serious cracking later. Never skip edge insulation foam around perimeters.
❌ Laying Screed Too Soon
We get it—deadlines are tight. But applying screed over a damp or dirty subfloor? That’s a recipe for delamination and failure.
👷 Why Hire Professionals for Subfloor Prep? | Preparing Subfloor For Screeding
You might be thinking, “Can’t I just DIY this?”
Technically, yes. But realistically, subfloor preparation is one of the most important phases in floor construction, and it’s rarely as simple as it seems.
Professionals bring:
Moisture meters and grinders
Knowledge of local humidity issues (especially in Malta)
Experience identifying weak spots
Access to high-performance primers and tools
So whether you’re doing a small home renovation or a large commercial floor, it pays off to get expert help.
✅ Need support? You can buy materials or book our full screeding service by contacting us here:
🔗 https://kibitec.com/contact-us/
🛒 Check Out Our Screeding Services | Preparing Subfloor For Screeding
At Kibitec, we specialize in high-quality screed installations across Malta—from traditional bonded screeds to flowing screeds over insulation and underfloor heating. Our team handles everything from site prep to curing.
We also offer:
Free quotes
Moisture testing
Thermal and acoustic insulation solutions
Fast-drying options (ready in days, not weeks)
👉 Learn more about our professional service options here:
🔗 https://kibitec.com/screed-malta/
📞 Contact Us Today | Preparing Subfloor For Screeding
Don’t leave your flooring success up to chance. Preparing subfloor for screeding is one of those steps where shortcuts can lead to costly long-term issues.
Whether you’re planning a home renovation in Sliema or a new commercial space in Valletta, we’re here to help.
🔗 Reach out today for a quote or consultation:
👉 https://kibitec.com/contact-us/
✅ Final Thoughts | Preparing Subfloor For Screeding
Preparing subfloor for screeding isn’t glamorous—but it’s essential. A well-prepped subfloor leads to a level, durable, and professional screed finish that holds up over time, even in Malta’s unique climate.
By understanding the steps, using the right materials, and avoiding common pitfalls, you can ensure a flooring foundation that stands the test of time.
Ready to get started? Whether you want to DIY or let professionals handle the hard stuff, Kibitec has the products, services, and expertise to guide you.