If you’re planning a new build or renovation in Malta, you’ve likely come across the term screed application process. But what exactly is it, and why should you care? Whether you’re a homeowner aiming for a perfectly smooth living room floor or a contractor looking to deliver flawless results, understanding this process can save you time, money, and future headaches.
In this post, we’re going deep into the screed application process—what it is, how it works, and why it’s crucial for both residential and commercial projects in Malta. You’ll also learn when it’s time to call in the pros (like Kibitec) and how to ensure you’re getting value for every euro you spend.
Let’s get started!
✅ What Is the Screed Application Process? | Screed Application Process
The screed application process refers to the step-by-step method used to apply screed—a cement-based mixture—over a subfloor. Its purpose is to create a level, durable surface that’s ready for microcement, tiles, wood, vinyl, or carpet. Think of screed as the unsung hero of flooring. You don’t see it once the final finish is in place, but without it, that finish will be uneven, cracked, or just plain disappointing.
In Malta, screeding is especially important because our buildings often use traditional concrete slabs or stone, which need leveling before a finished floor is installed.
There are two main types of screed commonly used:
Traditional sand and cement screed – mixed on-site or pre-bagged.
Liquid screed (self-leveling) – often used in larger areas or underfloor heating systems.
Regardless of the type, the application process follows similar principles.
🧰 Step-by-Step Breakdown of the Screed Application Process | Screed Application Process
Here’s how professionals carry out a successful screed application:
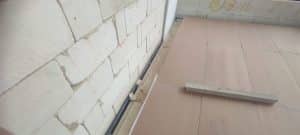
1. Surface Preparation
No process starts without a solid foundation. The existing concrete slab (also called the substrate) must be cleaned, dry, and structurally sound. This includes:
Removing dust, debris, oils, or adhesives.
Filling cracks or holes with patching material.
Sometimes applying a bonding agent or primer to ensure strong adhesion.
Why it matters: Poor preparation leads to delamination and cracking—a costly fix in the long run.
2. Installing Edge Insulation and Expansion Joints
Before pouring begins, edge strips and expansion joints are added. These prevent the screed from cracking due to temperature changes or structural shifts.
In Malta’s warm climate, these steps are essential.
3. Mixing the Screed
This is a science. The correct water-to-cement ratio is crucial:
Too much water = weak screed.
Too little = difficult application.
Professionals use mixers or ready-mixed screed to ensure consistency. Additives like fibres or plasticisers may be included to improve strength, flexibility, or drying time.
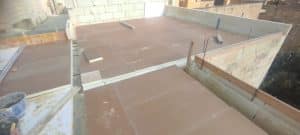
4. Laying the Screed
Screed is applied to the subfloor in sections using straight edges, trowels, or laser levels to ensure an even thickness. The standard thickness is between 40mm and 70mm, depending on the room usage and material.
5. Leveling and Compacting
Here’s where the magic happens. The screed is leveled to a laser or datum point to guarantee flatness. It’s also compacted to remove air bubbles and improve strength.
For self-leveling screeds, this step is easier—gravity and flow do the work!
6. Curing the Screed
This is arguably the most overlooked—but critical—part of the screed application process. Curing allows the mixture to gain its full strength:
Typically takes 7–28 days, depending on conditions and product.
Must be kept moist and covered (especially in hot Maltese summers) to avoid premature drying and cracking.
7. Final Checks and Surface Testing
Before installing flooring, the surface is tested for:
Moisture content – critical before laying tiles or wood.
Levelness – verified using laser tools or spirit levels.
Once these are passed, you’re good to go!
💡 Why the Screed Application Process Matters So Much in Malta | Screed Application Process
In Malta’s unique construction landscape—stone buildings, concrete slabs, and rapid temperature shifts—the screed layer acts as a crucial buffer. Without proper screed, final flooring can crack, lift, or become uneven over time.
Here are a few reasons why the process is especially vital here:
🏡 1. Malta’s Climate
High humidity and sun exposure can dry screed too quickly if not protected, leading to shrinkage cracks. This is why careful curing and moisture control are essential in the Maltese environment.
🛠️ 2. Subfloor Conditions
Many older homes have uneven, porous stone or poorly poured concrete. Screed solves these issues and allows modern finishes like microcement or parquet to perform well.
🔥 3. Compatibility with Underfloor Heating
Liquid screeds, in particular, are ideal for encapsulating underfloor heating systems, ensuring even heat distribution and energy efficiency—especially useful in modern homes and luxury developments in places like Sliema or Madliena.
💰 Screed Application Process Costs in Malta | Screed Application Process
Wondering how much this process will cost you? Here’s a realistic price range for Malta:
| Screed Type | Average Price per m² | Notes |
|---|---|---|
| Traditional Sand & Cement | €15 – €25 | Most common, good for general use |
| Liquid Self-Levelling Screed | €20 – €35 | Faster to apply, ideal for underfloor heating |
| Fibre Reinforced Screed | €25 – €40 | Improved durability for heavy loads |
Note: Prices vary depending on site access, prep work needed, and thickness required. For a custom quote, contact Kibitec.
🧑🔧 Should You DIY the Screed Application Process? | Screed Application Process
Short answer? Probably not.
Although some handy homeowners might be tempted to try it themselves, screeding is a technical job that requires:
Accurate leveling
Fast timing (especially with quick-drying screeds)
Knowledge of curing and material science
Hiring professionals ensures:
Warranty-backed work
Proper mixing ratios
No delays due to curing issues
Compliance with Malta’s building standards
And most importantly, it saves you from costly redos later!
Get peace of mind—book Kibitec’s screed service and know it’s done right the first time.
🔗 Where Screeding Fits into Turnkey Construction | Screed Application Process
If you’re planning a turnkey construction project in Malta, screed plays a foundational role. It comes after structural works and just before finishing materials are installed.
It ensures:
Level floors for tile or laminate
Ideal conditions for microcement coatings
Durability beneath high-traffic areas
In turnkey developments, screed is scheduled with surgical precision to keep timelines tight and finishes perfect.
🚪Ready to Start the Screed Application Process? | Screed Application Process
Whether you’re renovating a townhouse in Valletta or preparing a high-rise in St. Julian’s, screeding is a must. It’s the step that ensures your beautiful finish doesn’t fall apart weeks after installation.
You don’t need to guess your way through it. Let the experts at Kibitec handle it for you—with the best tools, trained crews, and materials suited for Malta’s climate.
👉 Check out our screed services here
📞 Or contact us directly to get started
4. Mixing the Screed Material
The quality of the screed depends greatly on its composition and how well it’s mixed. In Malta, the two most commonly used types of screed are:
Traditional sand and cement screed (mix ratio 1:3 to 1:4.5)
Flowing screed (self-leveling) – usually based on calcium sulfate or anhydrite
Manual Mixing (for Small Jobs):
Carried out on-site with a concrete mixer.
Components: sharp sand, cement, and water.
Mixing time: 5–10 minutes.
Applied quickly before it sets.
Machine Mixing (for Large Areas):
Floor screed pumps automate the mixing and transport process.
Ensures a consistent mix, ideal for commercial and larger residential builds.
💡 Tip: Always follow manufacturer specs if using proprietary screed systems to avoid weak spots or inconsistent curing.
Cost for mixing and preparation:
Manual: €8–€12/m²
Machine applied: €14–€20/m² (includes pump rental and labour)
5. Laying the Screed
Once your mix is ready, it’s time to apply it to the prepared substrate. This part of the screed application process must be executed efficiently and evenly:
Laying Techniques:
Bonded screed: Directly applied to the concrete base with a bonding agent (e.g., PVA or SBR slurry).
Unbonded screed: Laid over a damp-proof membrane.
Floating screed: Installed over insulation layers, often in underfloor heating applications.
Levelling Tools Used:
Straightedges, laser levels, screeding bars
For flowing screeds, spiked rollers are used to remove air bubbles
Application Tips:
Always start from the farthest corner and work backward toward the entrance.
Maintain a continuous process to avoid cold joints.
Finish with troweling to smooth the surface.
🔧 Pro Insight: In Malta’s humid coastal climate, use additives that help prevent shrinkage and rapid drying. Otherwise, your screed could crack prematurely.
Estimated cost:
Basic screed laying: €12–€18/m²
Advanced/insulated screed: €20–€30/m²
6. Curing and Drying Time
This is one of the most overlooked, yet vital parts of the screed application process. Proper curing ensures the strength and durability of the final floor.
Standard Curing Times:
Traditional screed: 1mm/day thickness (a 50mm screed = 50 days drying)
Accelerated screeds: Dry in 5–7 days
Self-leveling screeds: 24–48 hours for walkability
Curing Best Practices in Malta:
Use curing compounds to reduce evaporation.
Avoid foot traffic for at least 3 days.
Maintain ventilation, but avoid direct sun or wind.
Protect from heavy rainfall (especially in coastal and open sites).
🚨 Important: Flooring (like tiles, vinyl, or microcement) should never be installed on damp screed. Always test with a moisture meter.
💰 Potential cost impact:
If curing is rushed or skipped, repair works could cost €30–€70/m². It’s better to wait than to redo.
7. Final Surface Finishing
The last phase of the screed application process prepares the surface for whatever floor finish you plan to use.
Options Include:
Trowel finish: Smooth and suitable for tiling or vinyl
Brushed finish: Ideal for non-slip surfaces
Polished screed: Can be left exposed (industrial/minimalist look)
In high-end homes or luxury renovations in Malta, screed can even be coloured and sealed, serving as the final decorative layer. This is especially popular in turnkey construction projects where clients want a clean, modern look without the need for tiles.
🎨 Design Tip: Combine screed with floor heating for a minimal, stylish and functional result—especially in Valletta or Sliema apartments where space is premium.
Final Finishing Costs:
Trowel finish: Included in application
Polished screed: €25–€35/m²
Sealers and protective coats: €10–€15/m²
Common Mistakes to Avoid in the Screed Application Process | Screed Application Process
Inadequate surface preparation – leads to delamination.
Wrong mixing ratios – weakens the structure.
Ignoring drying times – causes flooring issues.
No movement joints – cracking due to expansion.
Poor workmanship – uneven levels and inconsistent finishes.
💬 Our advice: If you’re unsure, let professionals handle it. A poorly installed screed floor will cost more to fix than to do right from the start.
Why Choose Screed Flooring in Malta? | Screed Application Process
Besides its strength and durability, screed is ideal for Maltese homes due to:
Thermal benefits – Retains heat efficiently (perfect with underfloor systems)
Humidity resistance – Handles coastal weather better than wood
Versatility – Works under tiles, resin, or even microcement
Long lifespan – When installed correctly, lasts over 20 years
Whether you’re renovating a traditional townhouse in Mdina or building a new villa in Mellieħa, screed offers a strong, cost-effective solution.
Check Out Our Screed Services in Malta
Looking for reliable screed flooring services tailored for Malta’s climate and regulations? Our team at Kibitec has years of experience in delivering professional, high-quality results across residential and commercial projects.
👉 Check out our service – we provide a full-service screeding solution that includes consultation, supply, and professional application.
Get a Quote or Ask Questions
If you’re planning a renovation or build and want expert advice on the screed application process, don’t hesitate to reach out. Whether it’s 20m² or 2000m², we treat every job with the same attention to detail.
📩 Contact us here to get started with a free consultation.
Final Thoughts
The screed application process might seem technical, but when executed correctly, it forms the foundation of a long-lasting, flawless floor. From surface prep to curing and finishing, each stage requires expertise and precision.
In Malta, where properties are exposed to specific environmental challenges—humidity, limestone dust, and rapid temperature swings—working with knowledgeable professionals makes all the difference.
Let screed be the silent hero beneath your feet—supporting every step of your turnkey dream home.