Screeding concrete might sound like a niche or technical task, but it’s absolutely essential for creating level, strong, and long-lasting surfaces—especially when working up against walls. If you’re wondering how to screed concrete against a wall, you’re not alone. It’s a common question among homeowners and DIYers in Malta, and it’s one with a clear answer (and a few insider tricks).
Whether you’re planning to do it yourself or hire a professional, this guide will break it all down for you in plain language. And if you decide you’d rather have it professionally done, you can contact us here to get the job handled flawlessly.
What Is Screeding and Why Does It Matter Against Walls?| How To Screed Concrete Against a Wall
Screeding refers to the process of levelling and smoothing out freshly poured concrete, ensuring an even surface ready for final finishes or structural use. When this process involves walls—whether in a garage, bathroom, outdoor patio, or interior floor—the task requires even more precision.
The key challenge in how to screed concrete against a wall is achieving a flat plane while ensuring proper bonding and transitions between the floor and the vertical surface. Poor screeding leads to pooling water, weakened joints, and uneven finishes—not something you want in any Malta property.
Why It’s Crucial in Malta| How To Screed Concrete Against a Wall
In Malta’s humid climate and limestone-heavy architecture, proper concrete finishing is vital. Damp-proofing and ensuring that water doesn’t seep into joins between the wall and floor is essential. Correct screeding here not only creates a smooth finish—it protects the structure.
1. Preparing for the Screed: Tools, Materials, and Surface| How To Screed Concrete Against a Wall
Before jumping in, here’s what you’ll need:
Materials:
Concrete mix (pre-mixed or DIY)
Screed rails or guides
Plastic or DPM sheet (for moisture barrier)
Reinforcement mesh (optional)
Primer (if working over an existing floor)
Tools:
Straight edge or screed bar
Spirit level
Trowel and float
Bucket, mixer, wheelbarrow
Chalk line, measuring tape
Clean and Prime the Surface| How To Screed Concrete Against a Wall
Remove any dust, debris, oil, or old adhesive. For bonded screeds, apply a bonding primer. For unbonded or floating screeds, a plastic sheet can act as a barrier between the base and the new screed.
If your floor will support underfloor heating, this is the moment to place insulation and pipes.
Set Your Screed Level| How To Screed Concrete Against a Wall
Use battens or screed rails along the floor, ensuring they line up evenly with a spirit level. Pay special attention near the wall—you want your screed to taper gently into it without gaps.
2. Mixing the Concrete Screed| How To Screed Concrete Against a Wall
Concrete screed isn’t the same as standard concrete. It’s usually a finer mix made from cement and sharp sand in a 1:3 or 1:4.5 ratio, depending on usage.
For instance, for bonded screeds, you’ll want:
1 part cement
3 parts sharp sand
Add water gradually until it’s a semi-dry, workable consistency. It should clump in your hand without dripping.
In Malta, quality bagged screed mix costs approximately €5 to €7 per 25kg bag. For a professional application, screeding can cost between €15 to €25 per square metre, depending on thickness and complexity.
3. How to Screed Concrete Against a Wall – Step by Step| How To Screed Concrete Against a Wall
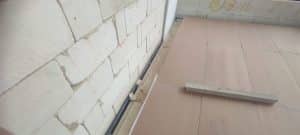
Step 1: Work From the Wall Outwards
Start pouring the concrete mix in sections, beginning right at the wall. Use your trowel to press the concrete into the corner where the floor meets the wall. This ensures there are no voids or air pockets.
Step 2: Compact the Mix
Use a tamping rod or float to press the mix down tightly, especially along the edge where it meets the wall. For high-traffic areas or garages, consider adding a reinforcement mesh.
Step 3: Use a Straightedge to Screed Level
Place your screeding bar across your screed rails or battens. Draw it towards you in a sawing motion, flattening the surface. This helps spread the mix evenly and remove excess.
Check your levels often with a spirit level.
Step 4: Finish the Edges
Once the concrete is levelled, use an edging trowel to smooth the join between the floor and the wall. Be gentle—don’t press too hard or pull the mix away.
For internal walls, you might want to curve the edge slightly to allow water to flow off easily.
4. Curing and Finishing the Screed| How To Screed Concrete Against a Wall
Concrete doesn’t dry—it cures. And curing properly is essential to preventing cracks and weaknesses, especially at wall joints.
How to Cure:
Cover the screed with plastic sheeting for at least 7 days
Mist with water every 24 hours in hot weather
Avoid walking on it for at least 48 hours
Optional Finish:
For polished floors, grind and seal after 28 days
For tiled surfaces, apply primer before tiling
Common Mistakes to Avoid| How To Screed Concrete Against a Wall
Skipping the moisture barrier: Leads to rising damp.
Not compacting near the wall: Creates gaps and future water ingress.
Overwatering the mix: Causes weak, powdery screed.
Screeding too quickly: Leads to uneven surfaces.
Getting the mix and level right takes a little time—but it pays off in results.
Need Help Screeding Your Floor in Malta?| How To Screed Concrete Against a Wall
If screeding feels overwhelming, don’t worry. That’s what we’re here for. At Kibitec, we offer professional floor screeding services across Malta—whether it’s for homes, garages, or commercial properties.
You can contact us here to get a quote or discuss your project.
Also, check out our screeding service to learn more about how we work and what’s included.
And if you’re working as part of a larger turnkey construction project, we can help manage that too—from the foundations to the finishes.
Step 5: Use a Straightedge and Float to Level Your Screed| How To Screed Concrete Against a Wall
Once your screed mix is laid in position, it’s time to bring out the straightedge. A straightedge is a long, rigid piece of wood, aluminium, or magnesium that you’ll drag across the top of the screed rails to level the concrete.
How to do it:
Rest the straightedge on the screed guides.
Slide it back and forth with a sawing motion while moving it forward.
The excess screed will be pushed forward or into low spots. Fill those gaps as you go.
Once leveled, use a bull float or hand float to smooth out the surface, especially near the wall.
Getting the concrete level at this stage is essential. Since you’re learning how to screed concrete against a wall, it’s crucial that your screed line remains flush and stable at the wall junction to prevent moisture ingress or uneven tile adhesion later.
💡 Pro Tip for Malta Renovators: If you’re screeding in high-humidity locations like bathrooms or sea-facing walls, consider adding a water-reducing admixture to the screed for better bonding and longer durability.
Step 6: Curing the Screed – Patience Pays Off| How To Screed Concrete Against a Wall
Curing is often skipped by impatient DIYers, but don’t fall into that trap. A poorly cured screed can crack or shrink away from the wall—a costly mistake in Malta’s climate where salt and moisture can creep in.
Curing Best Practices:
Cover the screed with plastic sheeting to retain moisture.
Keep the screed damp for at least 7 days, ideally 21 days.
Avoid walking on the surface during this period.
In Malta’s warm temperatures, screed dries quickly. But drying isn’t the same as curing. Curing allows the cement particles to fully hydrate and gain strength. For a high-traffic area or a heavy wall feature, a well-cured screed makes all the difference in terms of load-bearing and longevity.
If you’re not confident about handling curing schedules or mixes, you can always contact us at Kibitec for expert screeding services tailored for Malta’s environment.
Step 7: Final Finish and Surface Checks| How To Screed Concrete Against a Wall
You’re almost done! Now that the screed has cured, it’s time to check for flatness, bond strength, and edge alignment at the wall.
Here’s what to inspect:
Use a spirit level to check for high or low spots.
Tap-test with a rubber mallet: a hollow sound may mean poor bonding.
Look at the wall junction—is it snug, flat, and even?
Run your hand across the surface to detect any imperfections or ridges.
Optional Finish Types:
Trowel Finish – Smooth and ready for microcement or tiles.
Textured Finish – For better grip, especially in garages or outdoor spaces.
Power Float Finish – For commercial or heavy-duty floors.
Screeding against a wall can be challenging, but with these 7 smart tips, you now know exactly how to screed concrete against a wall with precision and confidence.
Why Screeding Against a Wall Matters in Malta| How To Screed Concrete Against a Wall
In the context of Malta’s limestone-heavy buildings and humid coastal zones, screeding concrete against walls is not just a technique—it’s a necessity. Whether you’re prepping for tiling, laying microcement, or insulating a space, a strong screed ensures:
Thermal insulation and moisture control.
A level base for underfloor heating.
Protection for underlying plumbing or electrical systems.
A crack-free junction between floor and wall.
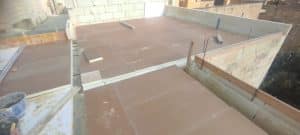
In fact, turnkey construction projects in Malta often rely on quality screeding to ensure all surfaces—from living rooms to rooftop terraces—are structurally sound and aesthetically pleasing. Learn more about screeding in turnkey construction here.
Need Screed Services in Malta? We’ve Got You Covered| How To Screed Concrete Against a Wall
We understand that not everyone has the tools, time, or confidence to take on screeding themselves. That’s why at Kibitec, we offer complete floor screeding services tailored for homes and businesses across Malta.
🔧 Services include:
Traditional sand/cement screeds
Fibre-reinforced screeds
Fast-drying screeds for quick renovations
Insulated or bonded screeds for energy efficiency
Whether you’re renovating your entire home or just doing one room, check out our screed service to get the job done right.
Contact Us Today| How To Screed Concrete Against a Wall
Not sure if your project requires screeding? Want an expert opinion? Need pricing?
📩 Reach out to us here: https://kibitec.com/contact-us/
We’re here to help guide you, quote your job, or offer screed materials and application services that match your needs—and budget—in euros.
Final Thoughts
Mastering how to screed concrete against a wall is a valuable skill—especially for property owners, renovators, or builders in Malta where structural integrity meets Mediterranean conditions.
Whether you’re a hands-on DIYer or prefer to leave it to the pros, understanding the process empowers you to make smart, durable, and cost-effective choices for your space.