If you’re planning a new build or renovation project in Malta, chances are you’ve come across the term screeding. Whether it’s for a bathroom floor, garage, or commercial space, knowing how to screed concrete is essential for achieving a smooth, level, and long-lasting surface.
In this comprehensive guide, we’ll break down everything you need to know about how to screed concrete—from materials and tools to step-by-step methods used by professionals. We’ll also explain when it’s best to DIY and when to call in the experts (hint: you can always contact us here if you prefer the job done right the first time).
Let’s dive in and take the guesswork out of screeding.
1. What Does “Screeding” Concrete Actually Mean? | How To Screed Concrete
Before we get into how to screed concrete, it’s important to understand what screeding really is.
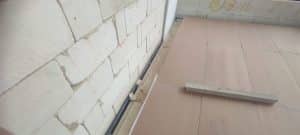
Screeding is the process of applying a layer of material over a concrete base to create a level, smooth surface ready for the final floor finish—whether that’s tile, microcement, vinyl, or polished concrete. Think of it as the foundation of your flooring finish. If your screed is off, the rest of your floor will be too.
In Malta, screeding is particularly crucial because of the island’s humid climate, limestone subsoils, and coastal exposure. A poor screed job can lead to cracking, uneven floors, and expensive repairs down the line.
So, if you want a floor that’s flat, stable, and built to last—learning how to screed concrete is step one.
2. The Types of Screed Commonly Used in Malta | How To Screed Concrete
There’s more than one way to screed a floor. Depending on your project size, budget, and location in Malta, you might choose from several types of screed.
✅ Traditional Sand and Cement Screed
This is the most common method in Malta. It consists of 4 parts sand to 1 part cement, applied over a concrete base.
- Thickness: Usually 50–100mm
- Curing Time: Around 28 days
✅ Self-Levelling Screed
Ideal for smoother finishes or areas where tiles will be installed. This liquid screed flows across the floor and levels itself.
- Thickness: As little as 3–5mm
- Curing Time: 24–48 hours
✅ Fast-Drying Screed
Perfect for projects on a tight timeline. These screeds cure in as little as 4 days.
- Often used in: commercial or rental property developments
When planning how to screed concrete, choosing the right type of screed for your setting is just as important as the technique.
3. Tools and Materials You’ll Need to Screed Concrete | How To Screed Concrete
If you’re taking on a DIY screeding project, preparation is key. Here’s what you’ll need:
🧰 Materials:
- Cement
- Sharp sand or screed-ready pre-mix
- Water
- Bonding agent (like PVA or SBR)
- Plastic sheeting or membrane (for damp-proofing)
🛠️ Tools:
- Mixing bucket or screed mixer
- Spirit level
- Straight edge or aluminum screed bar
- Float or trowel
- Screed rails or timber battens
- Gloves and knee pads (trust us on this one)
Most suppliers in Malta, such as Schembri & Sons, Camilleri Building Supplies, and Bonnici Bros, stock screeding tools and materials.
4. How to Screed Concrete: Step-by-Step Process | How To Screed Concrete
Alright, let’s get into the nuts and bolts of how to screed concrete.
🔨 Step 1: Prep the Base
First, make sure your concrete slab is clean, dry, and free of dust or debris. If you’re laying screed on an existing surface, apply a bonding agent to help the screed adhere.
For moisture-prone areas (like bathrooms or balconies), it’s wise to install a damp-proof membrane before screeding.
🔨 Step 2: Set Screed Rails
Using a laser or spirit level, set up screed rails or guides using timber battens or screed bars. These will help you maintain a consistent level throughout the area.
🔨 Step 3: Mix the Screed
For a sand and cement screed, mix at a 4:1 ratio with just enough water to bind—you want a semi-dry, crumbly texture. Add any waterproofing or strengthening additives at this stage if needed.
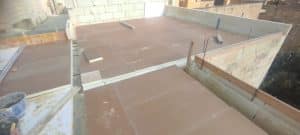
🔨 Step 4: Pour and Compact
Start in one corner and pour your screed, spreading it roughly in place. Use a trowel or shovel to compact it as you go—no gaps, no shortcuts.
🔨 Step 5: Level It Out
Rest your straight edge on the screed rails and drag it across the surface in a sawing motion. This levels the screed and exposes any low spots you can fill in immediately.
🔨 Step 6: Trowel Smooth
Once leveled, use a float or steel trowel to give the surface a finer finish. Don’t overwork it—just smooth out any marks or rough patches.
🔨 Step 7: Cure the Screed
Cover the surface with plastic sheeting or a curing compound and let it sit undisturbed for at least 7 days. For traditional screeds, 28 days is optimal for full curing.
5. Common Mistakes to Avoid When Screeding | How To Screed Concrete
Now that you understand how to screed concrete, it’s just as important to know what not to do.
❌ Overwatering the Mix
Too much water weakens the screed, making it prone to cracks. Aim for a “wet sandcastle” consistency.
❌ Rushing the Curing Process
Walking on the screed before it cures fully can ruin the surface and even shift the level. Let it rest.
❌ Skipping the Damp-Proof Membrane
Especially in Malta, where rising damp is common, neglecting this step leads to costly moisture issues later on.
❌ Poor Leveling Technique
If your rails or straight edge are off—even slightly—your final floor will show it. Precision here is non-negotiable.
If you’re unsure, it’s better to leave it to professionals who know how to screed concrete properly, especially for large or complex areas.
6. When to DIY and When to Hire a Screeding Professional in Malta | How To Screed Concrete
Sure, screeding can be a DIY task—if you’re handy and have a small, straightforward area. But there are times when bringing in the pros is worth every cent.
👉 Call in the Experts If:
- The area is larger than 20 m²
- You need to meet tight deadlines (e.g. commercial property)
- The substrate is uneven or damaged
- You’re working in moisture-prone zones like balconies or bathrooms
- You want to include underfloor heating—which needs a specialized screed
A professional screed team (like ours at Kibitec) ensures correct prep, perfect levelling, and durable results using high-grade materials.
7. Screeding for Turnkey Construction Projects | How To Screed Concrete
In many turnkey construction projects across Malta, screeding is a standard step in the finishing phase. That’s because the screed doesn’t just “fill in” a floor—it:
- Ensures proper height alignment for doorways and fittings
- Creates a base for tile or microcement installation
- Improves thermal insulation when paired with special additives
- Protects the underlying concrete from damage and wear
So if you’re buying a property that’s advertised as “finished” or “turnkey”, ask about the type of screed used, curing time, and whether waterproofing was included.
8. How to Screed Concrete with Underfloor Heating | How To Screed Concrete
If you’re renovating or building in Malta and aiming for energy efficiency, underfloor heating (UFH) is an increasingly popular option. But screeding over UFH requires some extra care to ensure proper heat distribution and system protection.
Here’s how to screed concrete when underfloor heating is involved:
🧱 Step 1: Install Insulation Boards
These go beneath the heating pipes to prevent heat loss downward. XPS or EPS boards are typically used.
🔁 Step 2: Lay and Fix Heating Pipes
Pipework is laid according to the heating system design and securely clipped to a mesh or insulation layer.
🧪 Step 3: Pressure-Test the System
Before screeding, test the pipes to ensure there are no leaks. This is critical—you don’t want to find out post-screed!
🏗️ Step 4: Use the Right Screed Mix
For UFH, flowing screeds (anhydrite-based) or fiber-reinforced sand/cement screeds work best. They allow better heat conduction and prevent cracking.
- Recommended depth: 50–65mm for flowing screed
💡 Pro Tip:
Avoid turning on the underfloor heating for at least 7–21 days, depending on the screed type. Once cured, gradually increase the temperature.
Want a flawless finish and full heat efficiency? Contact us here to screed your underfloor heating professionally.
9. Screed Costs in Malta: What to Expect | How To Screed Concrete
Keep in mind, these are average rates for standard residential applications. Complex designs, slope requirements (e.g. showers), or commercial-grade mixes may increase costs slightly.
We recommend getting a clear quote upfront, including curing time, material, and finishing. If you’d like a transparent and no-obligation estimate, contact our team here.
10. Green Building? Consider Sustainable Screed Options | How To Screed Concrete
As Malta slowly shifts towards more eco-conscious construction, many are asking: can screed be sustainable? The answer: absolutely.
Here are a few green screeding choices that don’t compromise quality:
♻️ Cement-Free Screeds
These use alternative binders like geopolymers or lime-based materials, reducing CO₂ emissions.
🌍 Recycled Aggregates
Instead of virgin sand or stone, some mixes use crushed glass, recycled concrete, or industrial byproducts.
💧 Low Water-to-Cement Ratio Mixes
Reduces waste and speeds up curing—saving both time and resources.
🌱 Natural Floor Finishes Over Screed
Polished concrete, microcement, or low-VOC vinyl over your screed can complete a sustainable flooring system.
At Kibitec, we’re always exploring the latest eco-friendly materials that work well in Malta’s climate. Ask us how we can make your next screeding project more sustainable!
11. Tips to Ensure a Durable, Crack-Free Screed | How To Screed Concrete
You’ve now got a strong grasp on how to screed concrete, but the secret to longevity lies in details. Here’s how to keep your screed looking perfect for years:
✅ Include Fibres or Reinforcement
Microfibres or welded mesh help control shrinkage and cracking—especially in large spaces.
✅ Maintain Expansion Joints
For every 6–8 meters of floor area, install an expansion joint to prevent thermal cracking.
✅ Control Temperature and Humidity
In Malta’s summer months, screed can dry too fast. Keep it covered and damp during curing to avoid surface cracks.
✅ Don’t Overwork the Surface
Over-troweling can weaken the surface or cause dusting. Trowel just enough for a smooth finish, then leave it alone.
✅ Monitor Curing
Traditional screeds take 28 days—but avoid installing final finishes (like tiles) until moisture levels are <75% RH.
12. Frequently Asked Questions About How to Screed Concrete | How To Screed Concrete
Let’s wrap up with some of the most common questions we get from our clients in Malta.
❓ Can I screed directly over tiles?
Not recommended. Screed adheres poorly to glazed tile surfaces. Tiles should be removed or at least primed and scored to allow bonding.
❓ Is waterproofing necessary under the screed?
In wet areas like showers, balconies, and ground-level rooms, yes. A waterproofing membrane prevents rising damp and floor damage.
❓ Can I apply screed over insulation boards?
Yes! This is commonly done when installing underfloor heating. Use reinforced screed and follow curing instructions closely.
❓ What’s the best screed for outdoor use?
For Malta’s climate, use a fiber-reinforced screed with waterproofing additives. It resists thermal movement and moisture.
❓ Can I polish screed to make it a finished floor?
Yes—especially with self-levelling or microcement screeds. It requires sealing and regular maintenance but looks stunning.
Final Thoughts: How to Screed Concrete the Smart Way in Malta | How To Screed Concrete
We’ve walked you through everything from what screed is, to how to screed concrete, and even explored sustainable options, pricing, and technical tips. By now, you know:
- Screeding is essential for a level and long-lasting floor
- Methods differ—choose based on area size, moisture, and use
- Proper tools, curing, and prep are key to a perfect result
- Professionals can save you time, money, and post-job headaches
So whether you’re screeding a 5m² bathroom or a 100m² showroom, make sure you follow best practices—or get expert help if you’d rather not risk it.
📞 Want a flawless screed finish without the stress?
👉 Contact us here for expert advice, project quotes, or to book a screeding team in Malta.
🔧 Interested in our full-service screed offering?
👉 Check out our screed services in Malta—we deliver quality, fast curing times, and stunning results.
🔗 Bonus Insight
Most high-end developments in Malta involve turnkey construction, where screeding is a vital part of delivering a complete, ready-to-live-in property. When done right, it’s the invisible hero of your floor’s foundation.